
Try your DIY hand at making a custom version of Zoopitee Dandy Bar.
Ingredients
You may scale up or down the batch. The following will make about four 1-1.5 ounce bars.
5T beeswax (grated or pellets)
3T shea butter
1T mango butter
1T dandelion-infused sunflower oil
1T rose petal-infused coconut oil
10 drops essential oil of choice (optional)
2-3 drops Vitamin E (optional natural preservative)
Ingredient Notes: I prioritize organic, fair trade, raw, local, and/or unrefined beeswax, oils, and butters for Zoopitee products, but you decide which ingredients work for you. Sunflower oil quality can vary greatly, so if you cannot find a good quality unrefined sunflower oil, perhaps substitute another oil. In fact, you may substitute other kinds of oils and butters as you like. Keep in mind the firmness of each ingredient when swapping. For oils, try olive, jojoba, apricot kernel, argan, in addition to those shown above. You may also mix and match shea, mango, and raw cacao butters. Want to substitute plain oils for the infused oils the first time around? That's fine. (Infused Oil blog post coming soon.) When it comes to essential oils, choose what works for you depending on your intended use or mood. Please be safe when preparing lotion bars for children, omitting essential oils that are not safe for your child's age.
Equipment
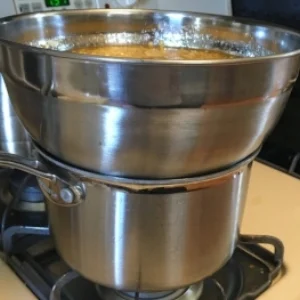
-Double boiler (Or make one by using a metal bowl set over a pot. See picture.)
-Metal stirring spoon
-Folded towel for blotting the wet pot/bowl before pouring bars into molds
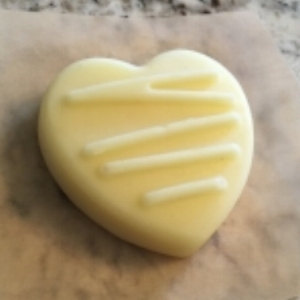
-Molds for bars. Get creative here. Don't run out and buy fancy molds that you will use once. Borrow from a friend or neighbor or use muffin liners in a tin or whatever you have lying around. For the heart bar above, I borrowed a chocolate mold from my good friend Susie at Whole Beauty Foodie.
Method
1. Gather all of your ingredients. Set your (completely dry) molds up where you can easily and quickly pour them and have your blotting towel nearby. Your bar mixture will solidify once off the heat, so you want to be able to blot the water off the pot and transfer the mixture to the molds ASAP.
2. Measure your beeswax and butters into the top pot of the double boiler (or top bowl). Be absolutely certain the container is dry. Water can make your bars oxidize faster than you would like. We don't like to eat rancid oils around here NOR slather them on our body. A good trick, if you are hand drying a freshly washed bowl, is to completely dry it with a hair drier.
3. Fill your lower bowl with a few inches of water, a level where the water just touches the bottom of your top pot/bowl. You want enough for good heat transfer, but not so much that it could boil over and sputter into your butters.
4. Turn the heat to high for a few minutes to get the water heating, then down to medium, stirring your beeswax and butters until they start melting. When they do, lower the temperature to low for a minute, and continue to stir. Then turn off the heat. We want the butters to just melt but not get hot. If you need to add more heat, do so, but go slowly.
5. Once melted, add the infused sunflower and coconut oils and stir well to combine. Add the optional essential oils and Vitamin E. Stir well, but briefly to not overheat essential oils.
6. Immediately lift the top pot out and blot any steam or water on your towel so it doesn't drip into your molds. Quickly but carefully pour the mixture into your molds. If it hardens up on you, you can very gently reheat, but this is not ideal once the essential oils are added.

These store nicely at room temperature all through the year. I keep mine in little tins as pictured so I can carry them around, but you can set on a little plate in your bathroom or bedroom for daily use or make a beeswax bag pouch. Again, get creative with what you have lying around.
Note: You will likely have thick lotion stuck onto your spoon and pot. I never waste good ingredients (nor will you want to send them down your sink -- clog hazard!) so scrape any extras into a small jar for later use. OR use this as a preview of your new creation and rub it right into your arms, legs, cheeks, hands etc. It's a kitchen spa day!
Well there it is.
My first blog post ever. Although I can be long-winded in person, I hope I didn't lose my technical writing skills (i.e. brevity) from my days in biochemistry. My goal in these Zoopitee Do! posts are to eliminate blog bloat and just get to the point. But please comment if I've missed any necessary clarifications. In the future, if I have something interesting or important to say, perhaps I'll be more wordy.
Now it's your turn to be wordy. I'd love to see links to your creations in the comments. How did you make the bar your own? What oils did you use? What scent combinations? Please share with our Zoopitee community.